How to install Windows 95? (VMs / Physical hardware) – Step-by-step
Greetings!
As you may know, Windows 95 was one of the — if not the — operating systems that revolutionised the way we use personal computers. Released on 24 August 1995, back when the World Wide Web and the internet in general were still in their infancy, this operating system was a real sensation! Replacing the now-legendary Program Manager with the brand-new Start Menu and Taskbar (Windows Explorer), Windows 95 was one of the most groundbreaking operating systems of its time, and, personally, one of my favourites (even though I wasn’t around back then).
If you want to revisit the past, or perhaps experience this OS for the first time, you’ll naturally need to install it somehow. And that’s where this article comes in, as I’ll be showing you step-by-step (and in detail) how to install Windows 95. This applies to both Virtual Machines (VMs) and physical hardware.
Preparation
System requirements
Physical hardware
To begin with, in the case of a physical computer, we need to know the minimum system requirements.
To run Windows 95 with some issues and slowness, we need at least:
- CPU: Intel 386DX or compatible
- RAM: 4 megabytes
- Storage: around 50 megabytes (without optional features)
These are minimum requirements well below today’s standards. Even back then, many users already had PCs far more powerful than the listed requirements. We were in the Pentium era, with clock speeds ranging between 100 and 133 MHz (prior to the OS’s release date). Of course, the 486s were still going strong, as several OEMs were selling computers with those processors.
To run Windows 95 (without any problems or slowdowns), you need at least:
- CPU: Intel 486 or compatible
- RAM: 8 megabytes
Once again, nobody should have any trouble finding hardware that meets these requirements. However, it is worth noting that, even with specifications well above the recommended levels, Windows 95 will struggle to make full use of these resources. A good example of this is that amounts of Random Access Memory (RAM) exceeding 2 gigabytes will prevent Windows 95 from running, as the operating system itself is a kind of 16/32-bit hybrid. In other words, it is the 16-bit part of the operating system that prevents the use of more RAM.
Note that you will need a floppy disk drive and floppy disks themselves to run MS-DOS*, in order to boot the system, format the hard drive to the required file system, and run the setup programme. And, obviously, you’ll also need a CD-ROM drive, as the standard installation medium for Windows 95 is, by default, the aforementioned CD-ROM.
So, in my opinion, if you want to install Windows 95 on physical hardware, I’d try to find hardware as close to that era as possible. PCs from roughly 1992 to 2004 wouldn’t have any RAM or CPU issues…
* technically, it is possible to do this without using a floppy disk, if you don’t have any floppy disks or drives. Here’s a link to a blog (O Computador com Windows; you might know it) that I really like, where you can carry out this procedure using a USB stick. Click here (website in Portuguese).
VM (Virtual Machine)
Basically, there are no issues here, as these can emulate any amount of RAM and storage. They can even emulate a floppy disk drive and a CD-ROM drive. You just need to bear in mind the minimum requirements mentioned earlier.
Required files
Once you’ve met the requirements, it’s time to download a few things! In particular, the Windows 95 disk images (ISOs) (if you don’t have a physical/original copy) and, inevitably, the MS-DOS disk images.
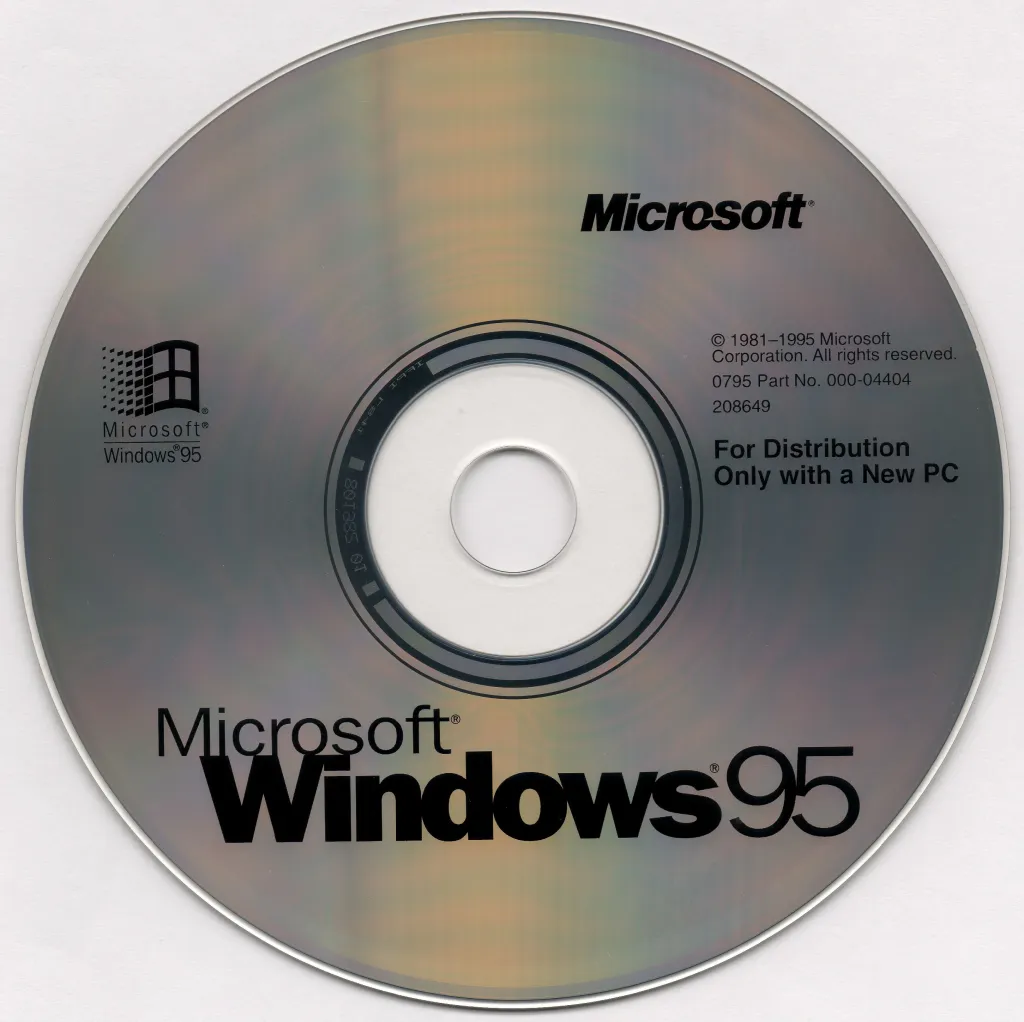
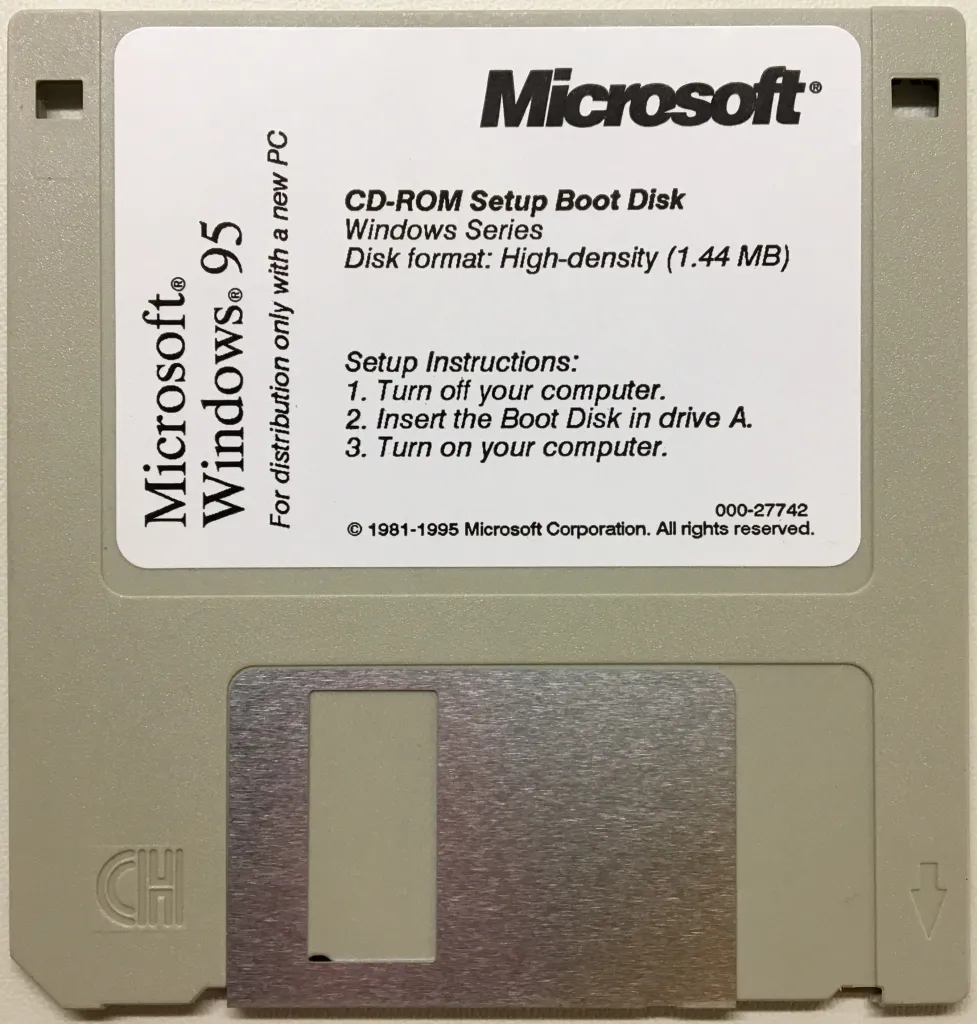
You can download the Windows 95 CD-ROM here and the MS-DOS floppy disk image here.
Installation
To clarify, I will be carrying out this procedure on a Virtual Machine simply because it is more convenient and quicker. Should any errors or problems arise, I can start again by deleting the previous virtual machine. The procedure is the same for both options.
MS-DOS Phase (pre-configuration)
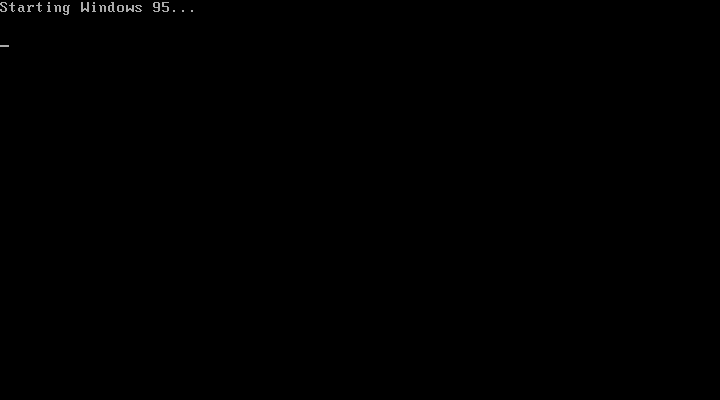
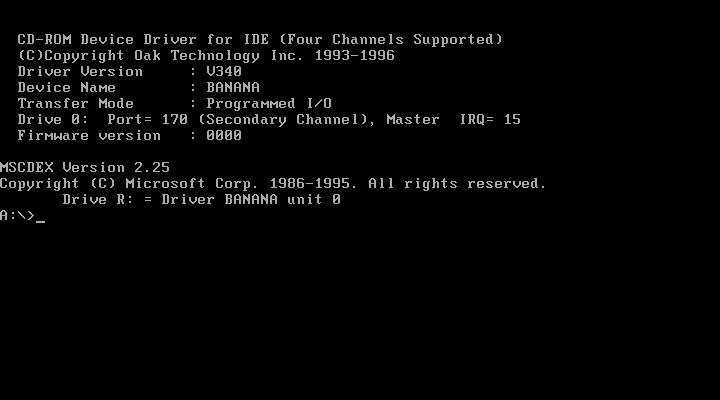
- Insert the MS-DOS boot disk into the floppy disk drive and the Windows 95 CD-ROM into the CD-ROM drive, then switch on the PC. In your BIOS settings, change the boot order and set the FDD (Floppy Disk Drive) as the first boot device. The computer will boot from the floppy disk you have inserted.
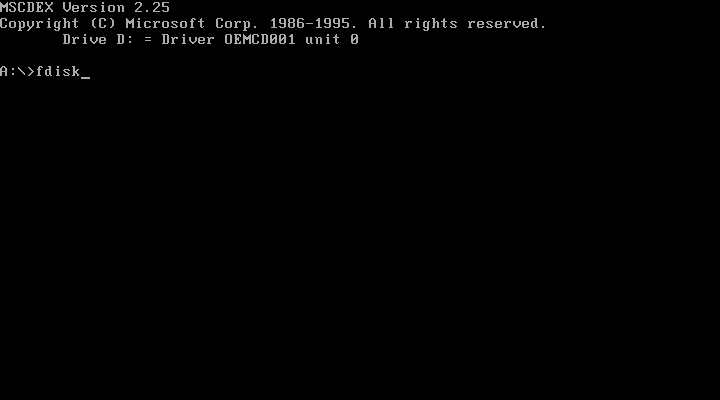
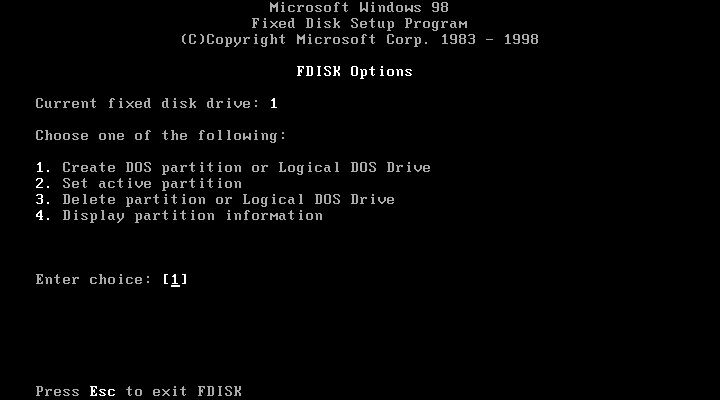
- Now, type FDISK. This will prepare the hard drive by formatting it to the required file system.
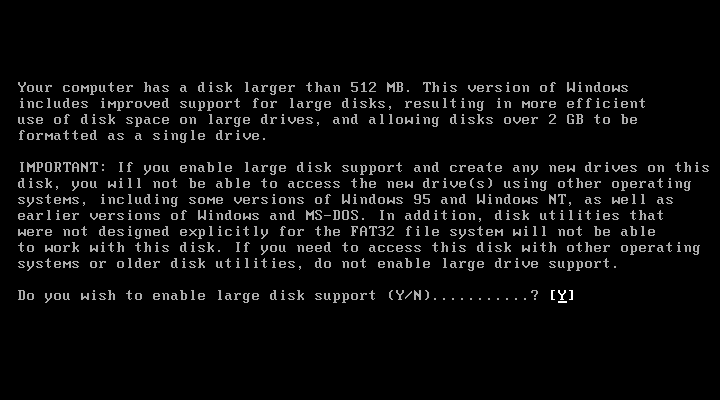
- Next, this prompt will appear. Type [Y] (yes) if you have a hard drive larger than 512MB.
- In this menu, enter the number 1. This will create a DOS partition so that you can subsequently format it to FAT16.
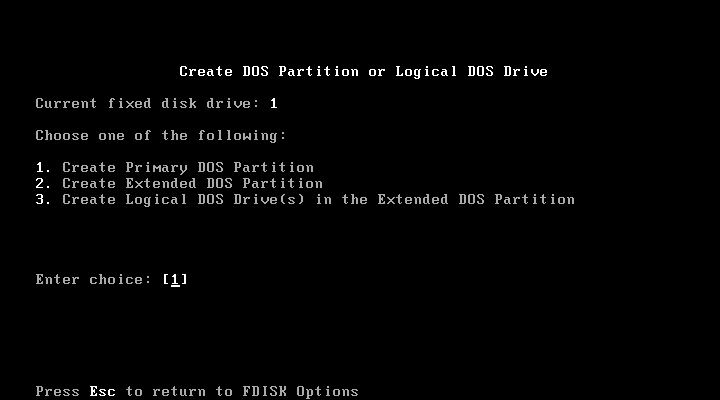
- Next, type 1 again to create a primary DOS partition.
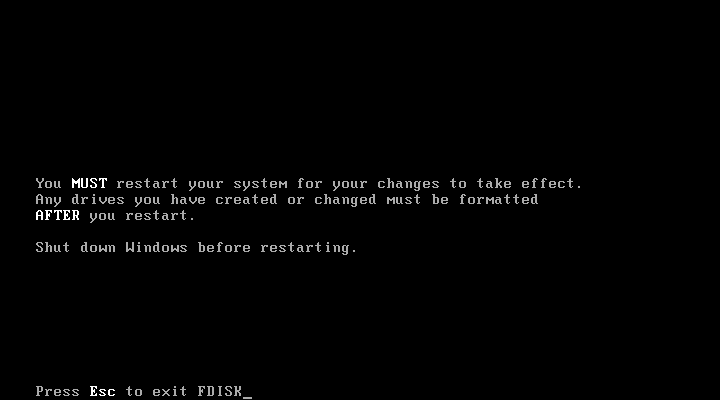
- You will now be asked to restart the computer to apply the changes.
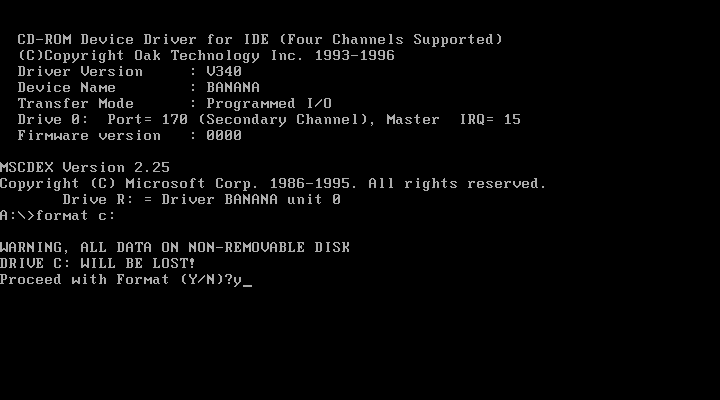
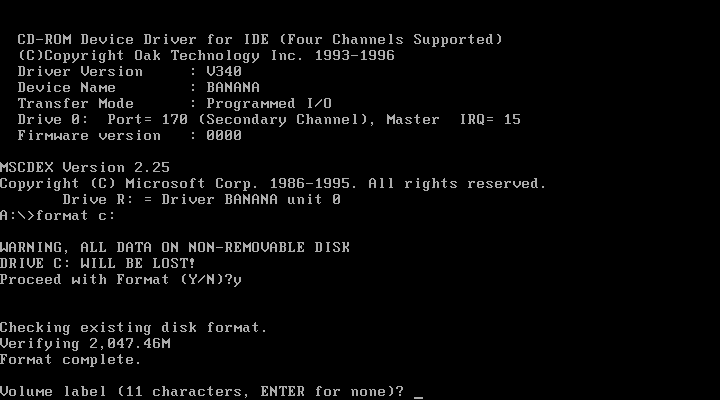
- Once the system has restarted, it’s time to format your secondary drive with the appropriate file system. Type
FORMAT C:. A confirmation prompt will appear. Press [Y].
- After formatting, you will be asked to enter a Volume Label. You can type one in if you prefer. It must be a maximum of 11 characters. If you don’t want one, just press ENTER.
- Now, you must do exactly as shown in the image. If you haven’t selected the C:\ drive yet, now is the time to do so. Next, you need to create a directory to place some of the files from the Windows 95 CD-ROM. This is because the installation does not recognise the CD-ROM drive during the final part of the setup. Once the directory has been created, you need to copy the installation files. Select the CD-ROM drive and type the command below.
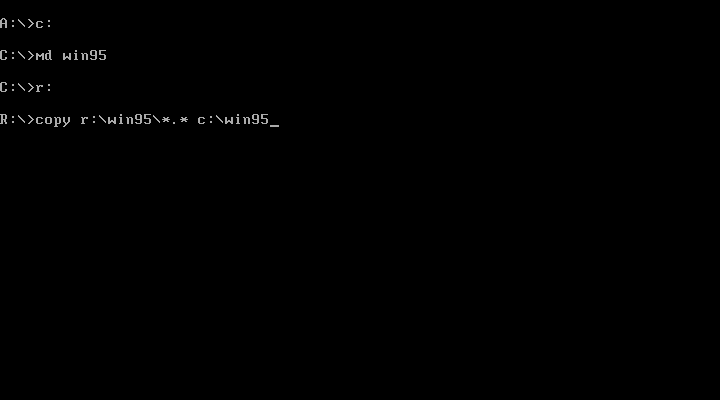
If you cannot see the image clearly, here are the commands, with comments explaining each one.
A:\>c:
// to select any drive, simply type the drive letter followed by a colon (:)
C:\>md win95
// md (make directory) is the command to create a directory; win95 is the name of the directory itself
C:\>X:
// X corresponds to the CD-ROM drive letter; in my case, it is R
X:\>copy x:\win95\*.* c:\win95
// copy from X:\win95 to C:\win95; *.* corresponds to all files in the directory
- With the files copied, it is time to start the Windows setup. Simply type CONFIG (or SETUP, if you are using a non-Portuguese version) and press ENTER.
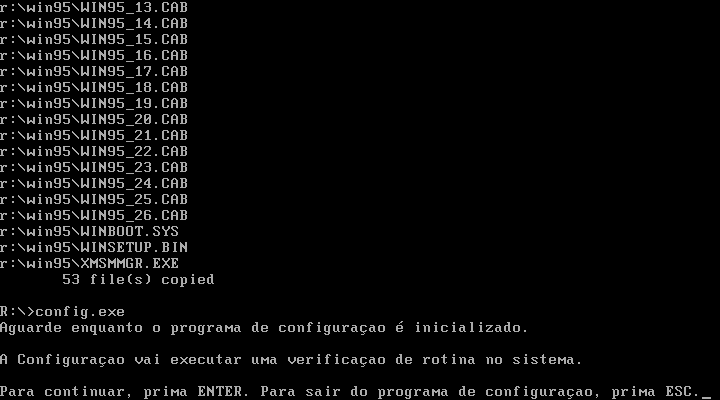
Setup phase
- Finally, we can begin setting up Microsoft Windows 95. As you may have noticed, we can now use the mouse, and therefore click on buttons. This mode is not yet Windows 95 itself; the installer uses a minimal Windows 3.1 environment. You can tell this by the style of the windows, which uses the old style. To begin, click [Continue].
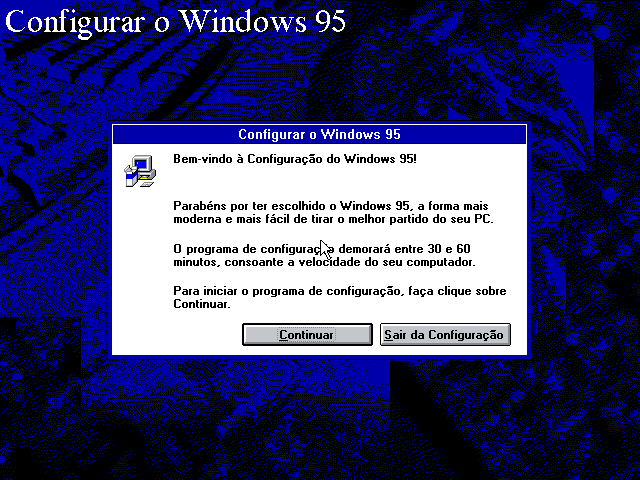
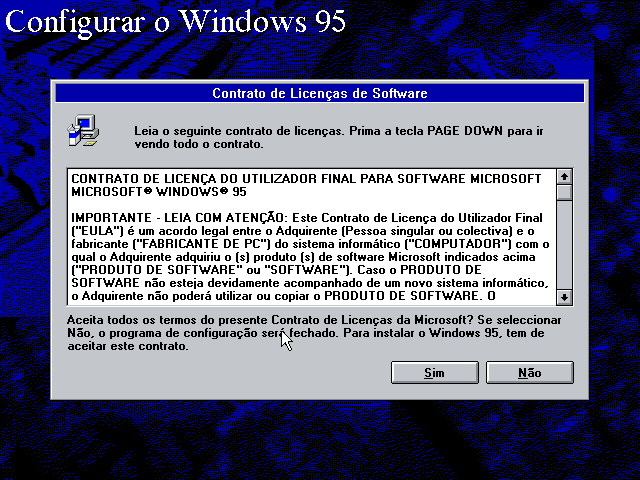
- You must accept the licence agreement to proceed. Click [Yes].
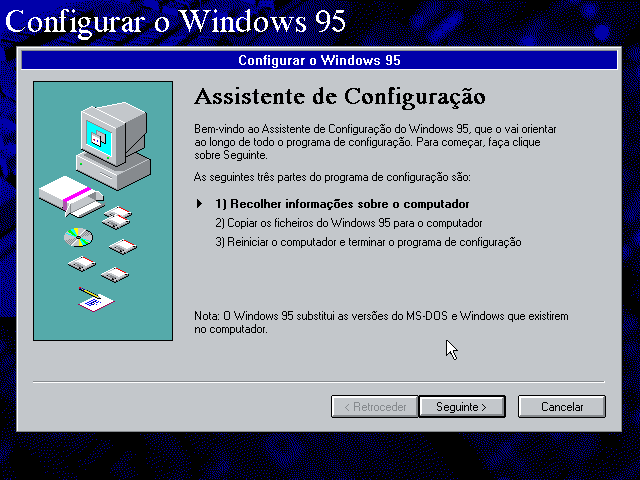
- The Setup Wizard appears, providing you with some information about the setup programme itself.
Click [Next >].
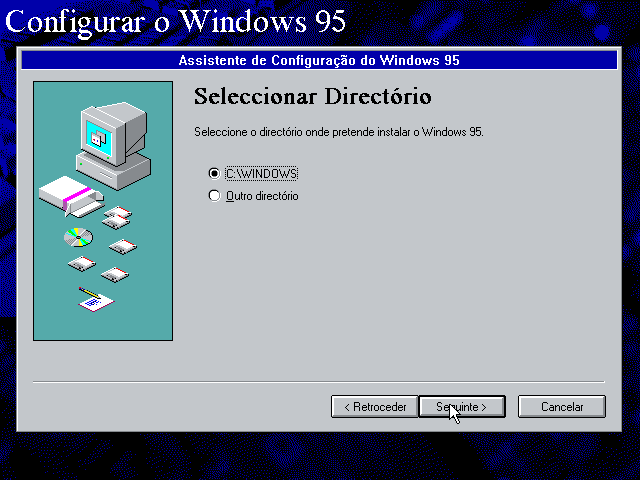
- Now, select the directory where you wish to install the system software. The default location is C:\WINDOWS, but you can enter another one. Click [Next >] to continue.
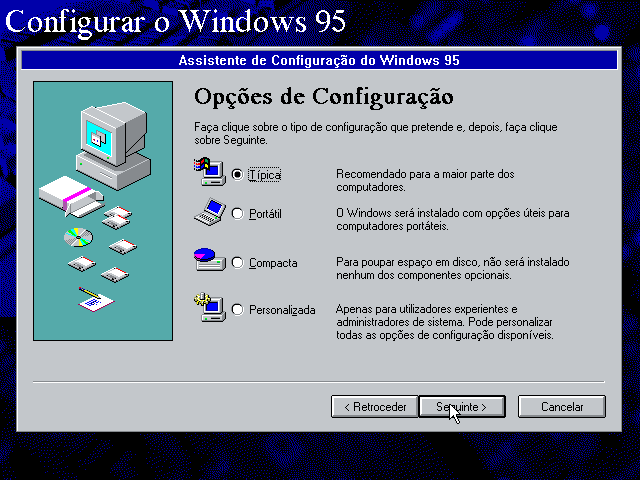
- When you reach this window, choose the type of installation. I won’t explain the different types, as the titles speak for themselves. In my case, I selected Custom. Again, click [Next >].
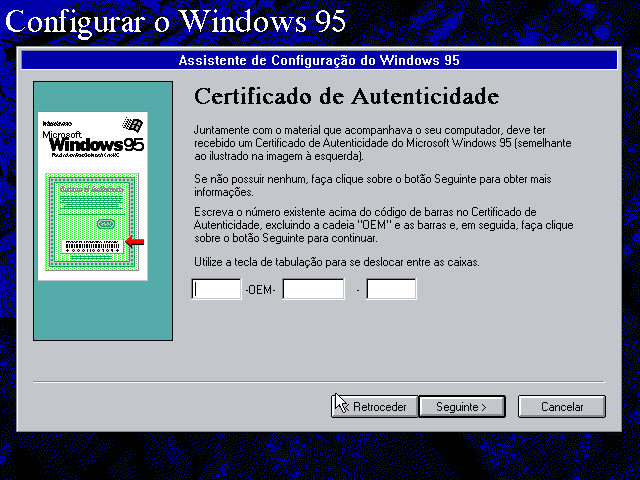
- This is where you enter your product key, which is referred to here as the Certificate of Authenticity. If you have a physical/original copy of Windows 95, enter the key that came with your copy. If you downloaded it from the link I provided, the key will be on the website itself. Don’t worry, this operating system is considered abandonware, so you won’t be breaking any laws. Once you’ve entered the key, click [Next >].
-
Enter your name and company, if you have one. Click [Next >].
-
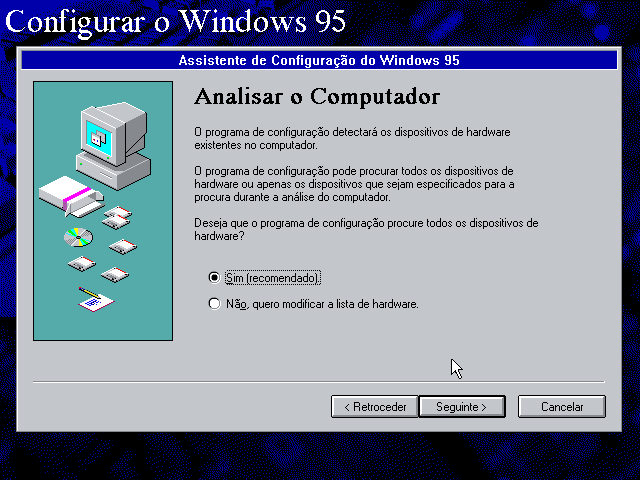
Now, the installation programme will “detect the hardware devices on your computer”. Yes is already pre-selected, but you can choose No. I won’t cover that option, as it will make this step-by-step guide longer than it needs to be.
Click [Next >].
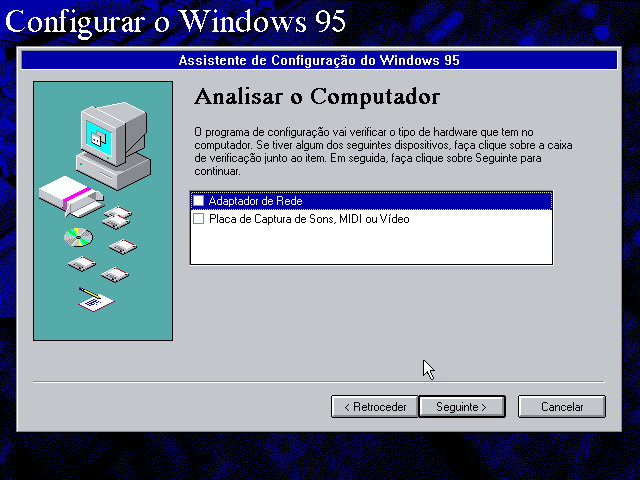
- To help the setup programme detect the various hardware devices, you must select the devices that your PC has. The list will be different for each installation, as the hardware itself differs. Tick the boxes you consider correct, and click [Next >].
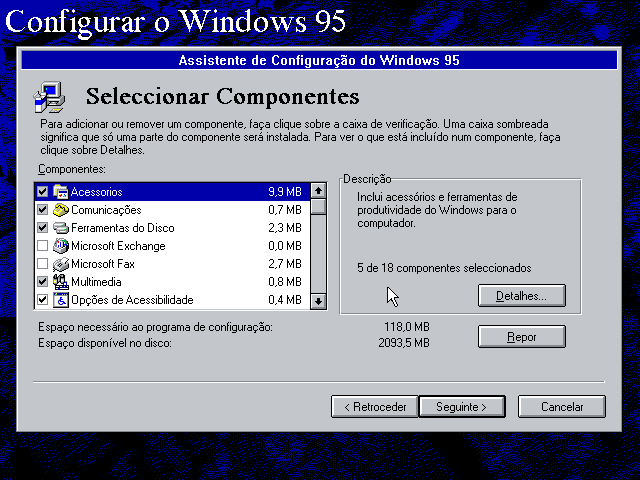
- If you selected the Custom option for the setup type in step 5, you will see this window. If you did not, skip this step and proceed to the next one.
Basically, here you can choose the components you want to install on your system. Don’t worry, you can add or remove components once you’re in the Desktop, after Windows 95 has been set up. If you’ve ticked everything, it will take up 156.5 MB of space. When you’re ready, click [Next >].
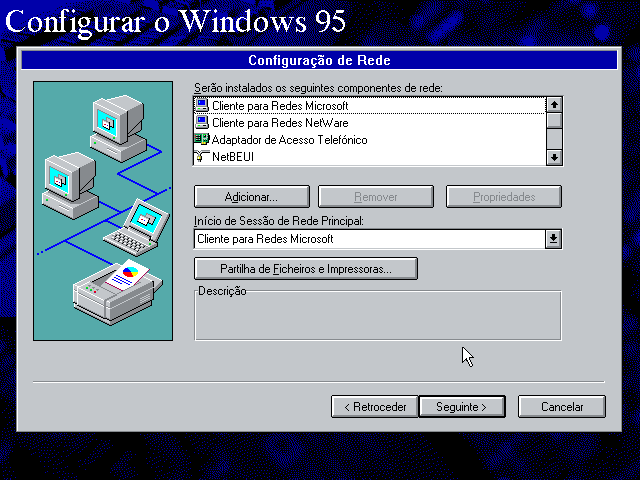
- As I ticked the network adapter in step 9, this window will appear, already showing the pre-installed components. You can customise the network as you wish, but do exercise some caution when using this OS on the Internet, as several exploits have been found in it. Again, when you are satisfied with your settings, click [Next >].
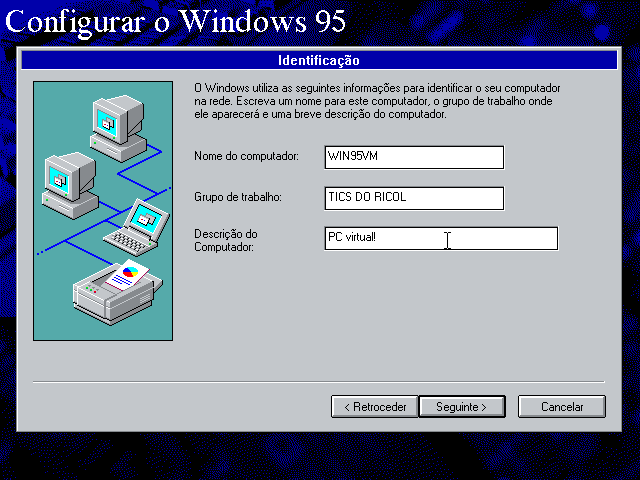
- In this window, you can give the computer a name, a workgroup and a description. Click [Next >].
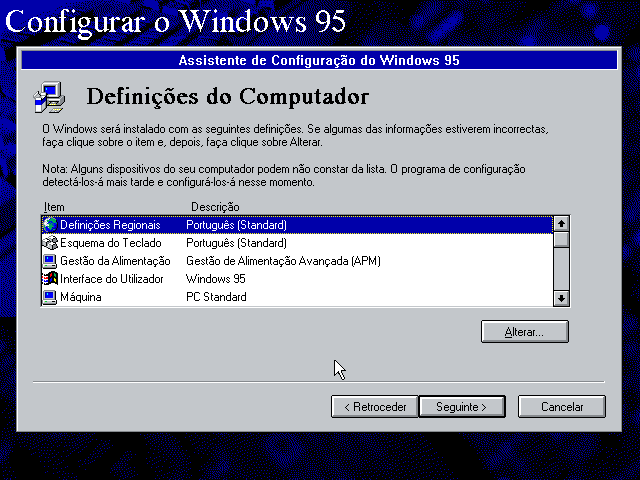
- Before the setup programme starts copying the Windows 95 files to your hard drive, you just need to take a final look at your settings. When you are ready, click [Next >].
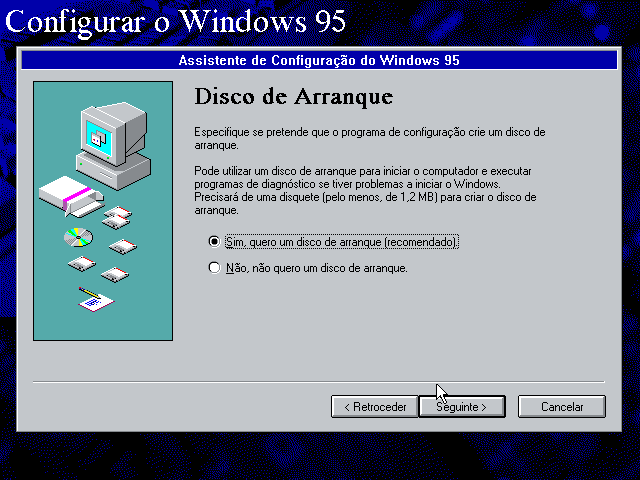
- The setup programme will ask if you wish to create a boot disk. For a VM, this is completely unnecessary, but for a physical PC, it is recommended. You will need to provide a blank floppy disk for the setup to copy the necessary files onto (although you still have the MS-DOS floppy disk you used at the start, so this would not be necessary). Click [Next >].
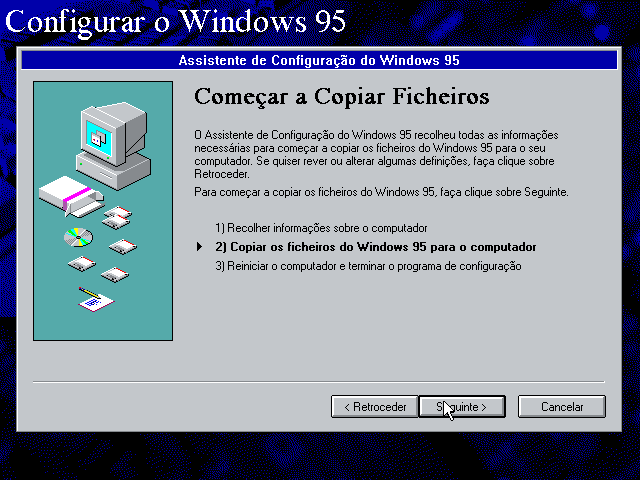
- The Setup Wizard will now inform you that it is about to start copying files. If you wish to review your settings, return to the window from step 13 by clicking [< Back]. If you are ready, click [Next >]. The file copy will begin.
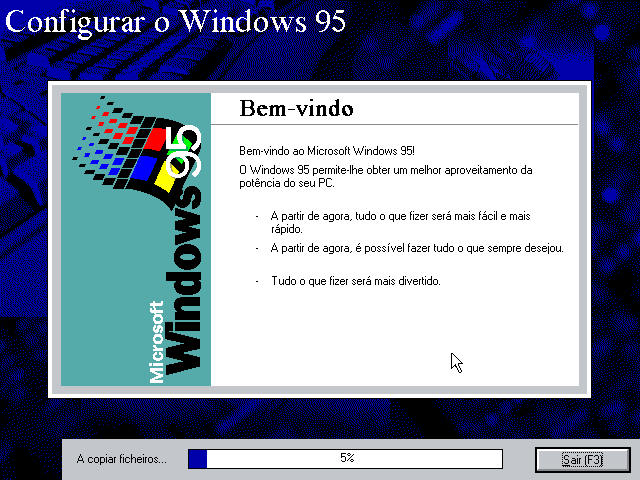
This process may take some time (especially if you are using a physical computer). Please wait and relax whilst Windows 95 is being installed on your PC.
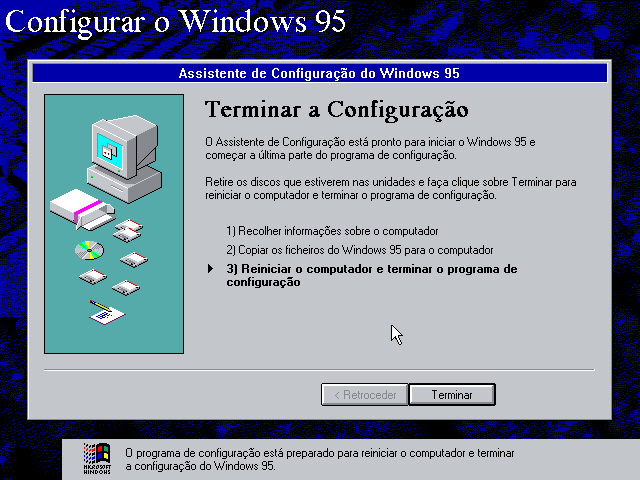
- Once the files have been copied, the Setup Wizard simply informs you that the final part of the setup is ready to begin. Click [Finish].
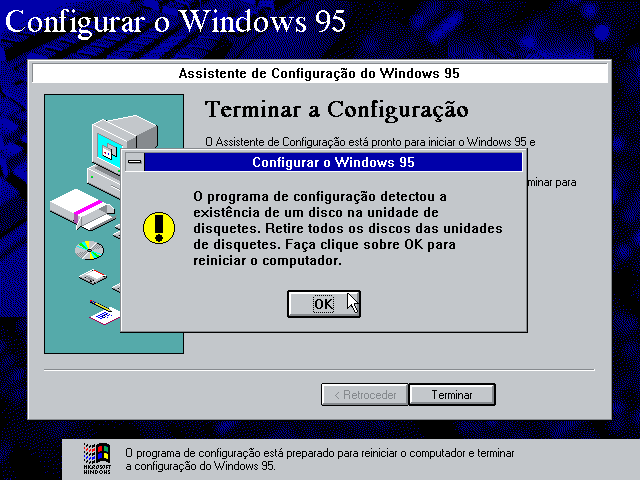
A warning will appear, telling you to remove any floppy disk from the floppy drive. Remove it, and click [OK]. The system will restart.
Post-configuration phase
- We’re almost there!
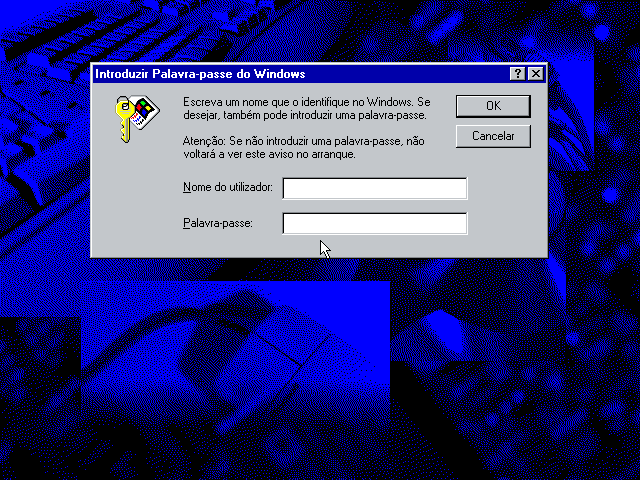
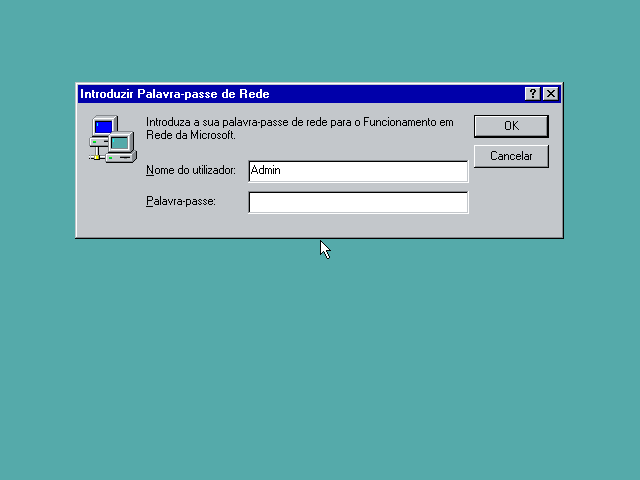
Once the restart is complete, this window will appear. Here you can create your user account by entering your username and password (optional). Click [OK] to continue.
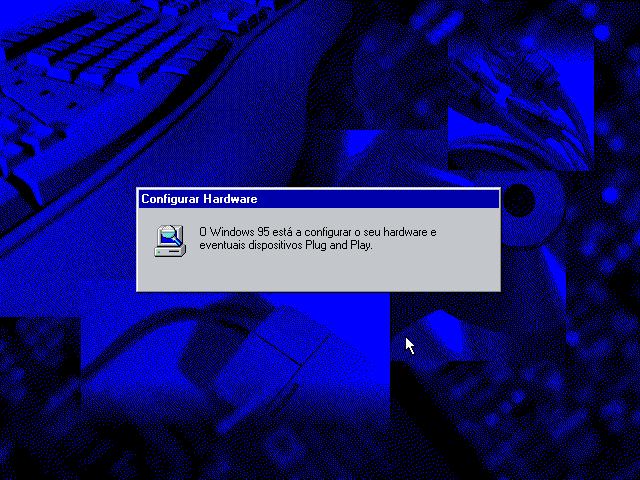
- Windows 95 will now search for Plug & Play devices, a very new technology at the time. Please wait.
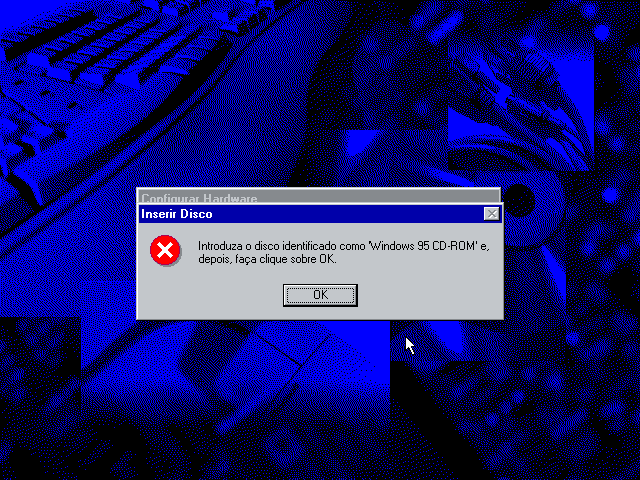
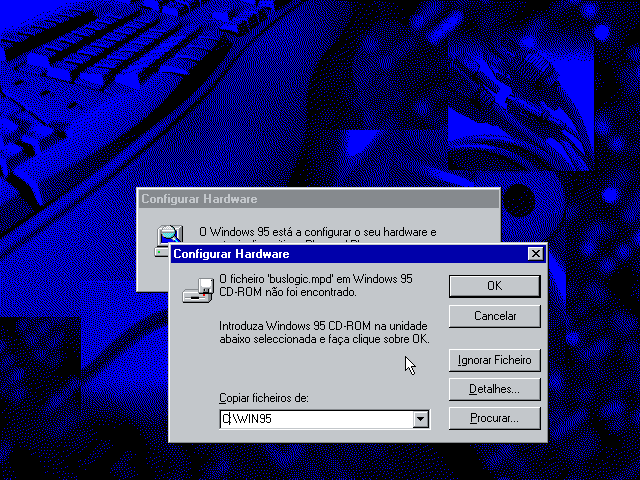
Eventually, an error will appear.
Remember the part where we had to copy some of the Windows 95 configuration files from the CD-ROM to secondary storage, in the MS-DOS interface? This is where that will be crucial. Windows wants to fetch some additional files from the optical disc, but as we don’t have the driver that enables the OS to recognise the CD-ROM drive (which was on the floppy disk; the driver is called MSCDEX), we cannot access the CD itself. Therefore, we have to redirect Windows to look not in the CD-ROM drive, but on the hard drive.
First of all, click [OK].
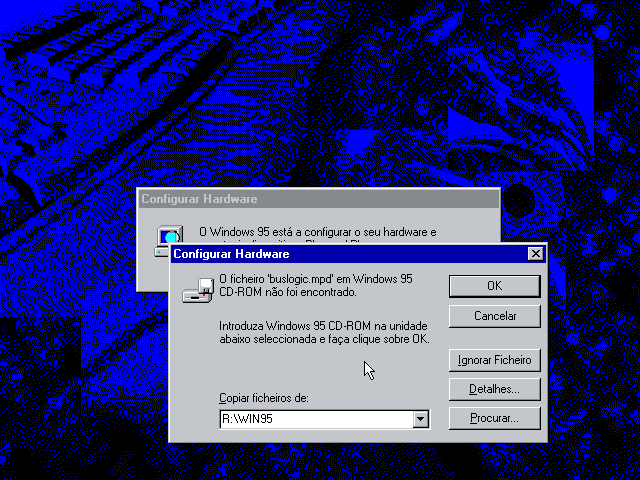
The system software will complain that it cannot find file X, where X is a system file. So, to resolve the issue, we simply need to change the path shown below. In my case, as I named the directory WIN95, I just need to replace the letter R (CD-ROM drive) with the letter C (hard drive). The rest remains the same, as Windows looks for the files in a directory called WIN95. If you have given your directory a different name, simply replace that with your own name.
Click [OK] when you are ready.
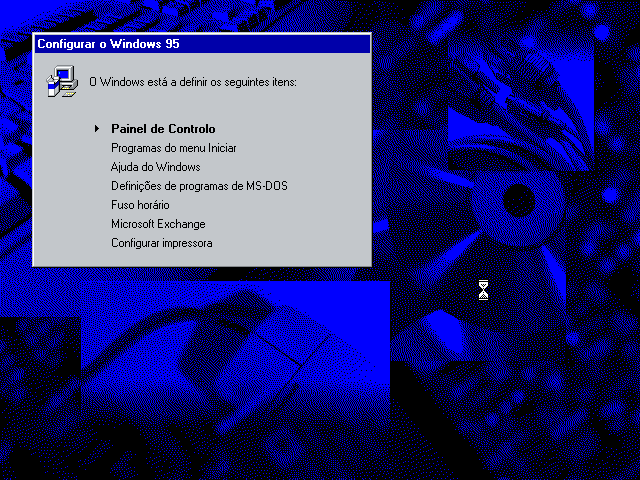
- Windows 95 will complete the post-setup phase with the following items. Again, please wait a few moments.
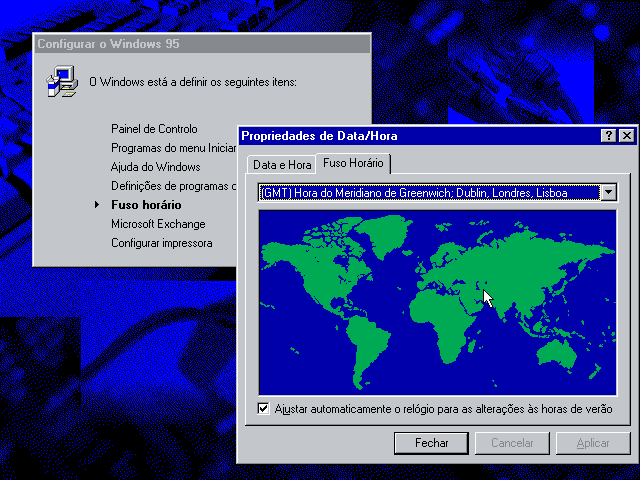
- You will be asked to confirm the date and time settings. Click [Close] to continue.
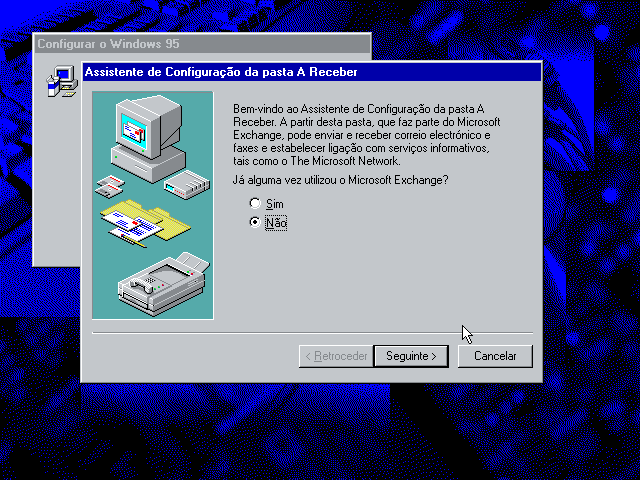
- Next, Windows will need to know if you want to set up Microsoft Exchange (Email Client) and, indirectly, The Microsoft Network (MSN). This is optional and, at least in my experience, I cannot get Microsoft Exchange to work, as the client technologies do not support the latest email services (at least, as far as I know). You can return to this window later if you feel up to the challenge of getting this working. Click [Cancel] to skip this window.
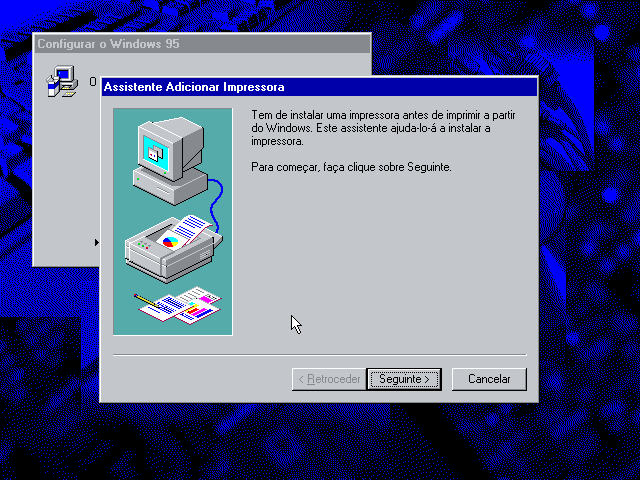
- Finally, the operating system will ask you to install a printer driver before you can print anything. Again, this is optional, as you can click [Cancel]. If you are using a physical PC and wish to print something, I strongly recommend following this brief setup procedure.
As I mentioned a moment ago, click [Cancel] to skip this setup.
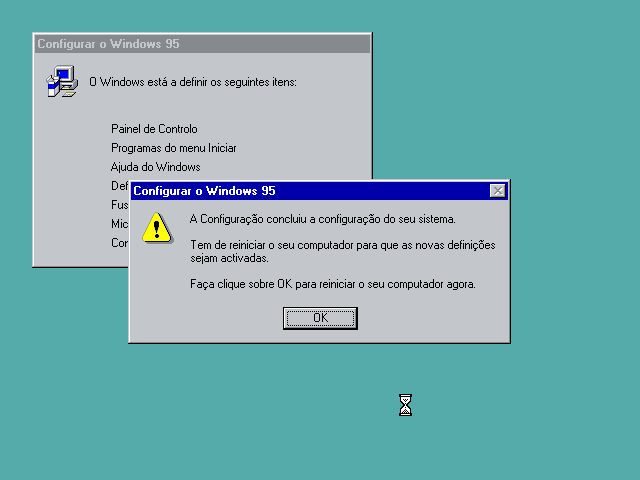
- A message will appear stating that you have successfully completed the system software configuration. Click [OK] to restart the system one last time.
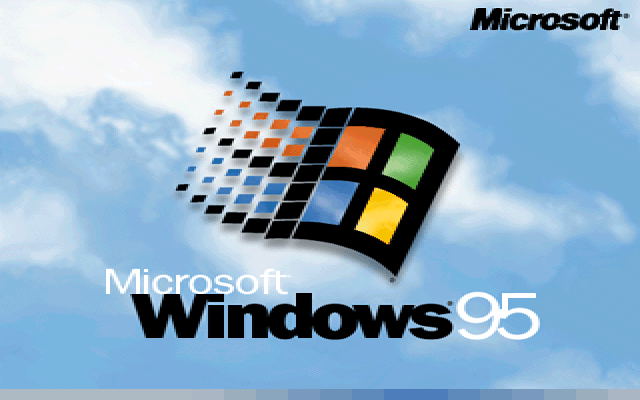
- We can now see the operating system restarting with the standard boot screen, which is very nostalgic for anyone who used this OS back in the day. I must say I’ve always liked these boot screens.
- Enter the username and password you created in step 1 and click [OK]. Windows should log you in…
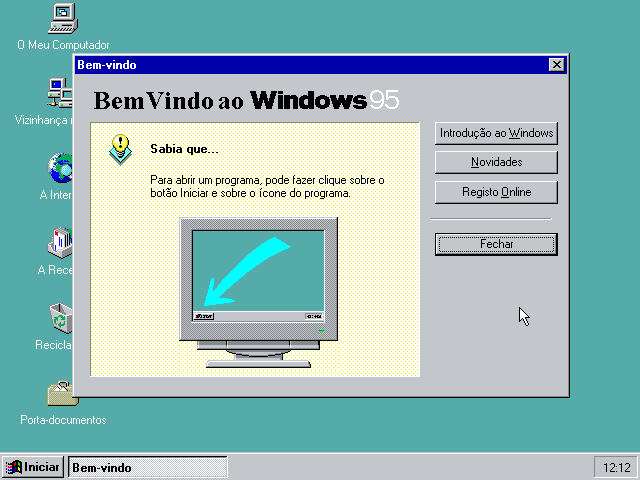
- Here we are on the Microsoft Windows 95 desktop!
From here on, you have the operating system correctly installed, and, basically, you can do whatever you like.
Personally, I’d recommend finding and installing drivers if you’re using a physical PC, mainly to make the system faster and more responsive. If you’re using a virtual machine, you just need to insert the virtual optical disc provided by the programme itself, which does the same as installing the drivers one by one.
I hope you enjoyed it! I loved making this tutorial; I think it can be a real asset for anyone wanting to install this classic operating system on their old computers to play DOS or Windows games from back in the day.
By the way, the cover image for this article was created by me. If you haven’t noticed, it’s a redesigned boot screen that tries to retain the look of the original.
Take care and see you next time! :)